 BLP Workbench
 Inventory
Inventory keeps track of how much of each product and material you have on hand, where it is, and every change to it. It covers receiving, adjustments, low-stock alerts, counts with a bar code scanner, purchase orders and stock reports.
Turning on Inventory
Inventory is a module and is off on a new install. An administrator turns it on in Admin › Modules; this also turns on Products & Services, which Inventory builds on. Inventory then appears under Operations in the sidebar.
Inventory options are in Admin › Settings › Inventory (also reachable from the gear button on the Inventory card in Admin › Modules). See Inventory settings.
Tracking stock
Stock belongs to items in Products & Services:
- Products track stock when Track stock is checked on the item's page.
- Materials always track stock. Use this kind for consumables and blanks you keep but never quote.
- Services never track stock.
Items with variants are stocked per variant: each variant has its own quantity, bin and low-stock alert.
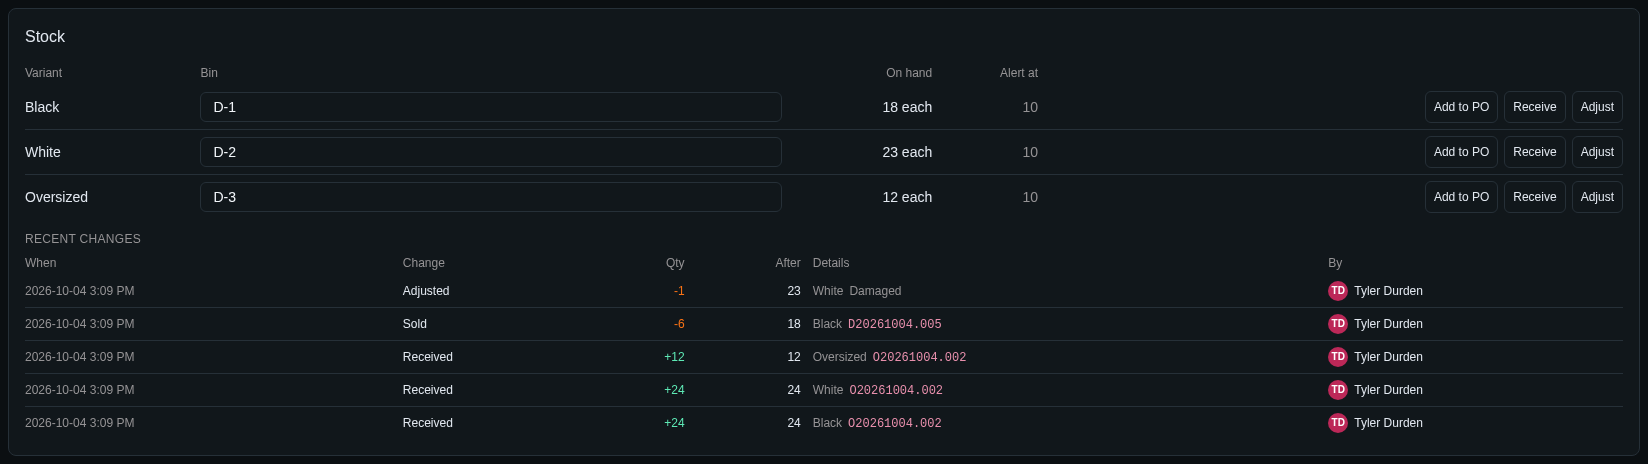
Once an item tracks stock, its page has a Stock card with the quantity on hand, buttons to Receive, Adjust and Move stock, Add to PO, and the item's Recent changes.
If stock was recorded on an item before it got variants, that stock is shown as "not assigned to a variant". Adjust it out and receive or adjust it into the right variants.
The Inventory page
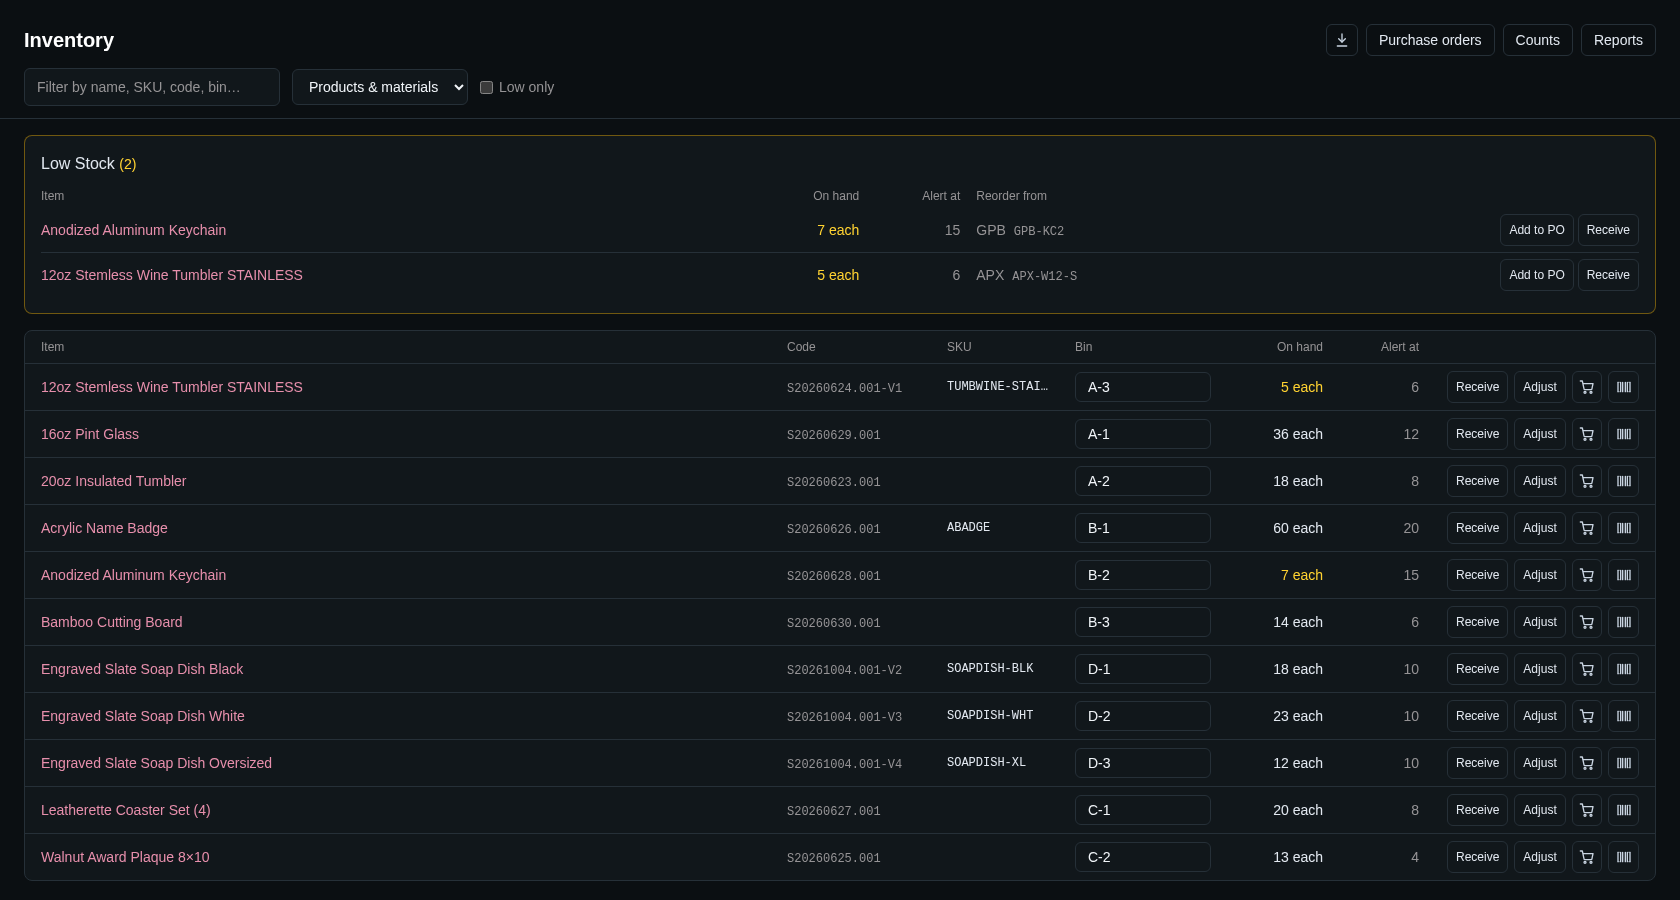
Open Operations › Inventory. The page shows the Low Stock card at the top and every stocked product and material below it, with:
- Item (click to open its page), Code (its stock reference) and SKU;
- Bin (in single-location mode, editable right in the list) or Locations (each location's quantity and bin);
- On hand (amber when low) and Alert at;
- buttons to Receive, Adjust, Move (multiple locations only), add to a purchase order (cart button) and print a label (bar code button).
Use Filter by name, SKU, code, bin…, the Products & materials list and Low only to narrow the list. Export to CSV downloads it.
The header has buttons for Purchase orders, Counts and Reports.
Bins
In single-location mode each item has one Bin / shelf label, such as "B-3". Type it in the list or on the item's Stock card and press Enter or click away; it saves right away. The bin is printed on stock labels and shown in count mode.
Receiving stock
Click Receive on an item to add a delivery to stock:
- Location (multiple locations only).
- Quantity.
- Unit cost: starts with the item's unit cost; change it to what you paid this time.
- Supplier: starts with the item's supplier (when the Suppliers module is on).
- Labels (with the Bar Codes module): Add to batch, Print now or None, and how many. The number follows the quantity received until you change it. Each device remembers your choice.
- Note: for example a packing slip number.
Click Receive stock.
To receive stock you ordered on a purchase order, receive against the order instead, so the order knows what arrived. See Receiving against an order.
Adjusting stock
Click Adjust to correct stock outside of a delivery or count, such as damaged pieces or material used in the shop:
- Change by (+/−): enter the difference, for example
-2. - Set on hand to: enter the new quantity.
- Reason: why, for example "Damaged" or "Used in shop".
Click Adjust stock. Stock can't go below zero unless Allow stock to go below zero is on in Admin › Settings › Inventory.
Locations
In Admin › Settings › Inventory, under Stock is kept, an administrator chooses between:
- As one quantity per item, with a bin label: the simplest setup, with one stock area.
- Per location: named locations, such as "Shop", "Back room" or "Van", each with its own quantity and bin.
When you switch to Per location, all current stock stays in the default location. Add locations under Locations with New location and Add. Rename a location by editing its name. A location you no longer use can be Archived; administrators can delete an empty one.
With locations, the Inventory page shows each location's quantity, the stock dialogs ask for a location, and Move moves stock from one location to another (From, To and Quantity).
Going back to one quantity
Switching back to As one quantity per item, with a bin label opens a preview. All stock moves into the default location (recorded as stock changes), and for each item you choose under Bin to keep which of its bin labels to keep. The other locations are archived. Click Consolidate to apply it.
Stock history
Every stock change is recorded and can't be edited or deleted; corrections are made with a new change. Each change records the type, the quantity, the new on-hand quantity, the location, who made it and when, and any note.
The types are Received, Adjusted, Counted, Moved, Consolidated, Sold (a won deal) and Returned (a reopened deal).
An item's Stock card lists its recent changes under Recent changes. Changes from a purchase order, deal or count show its reference; click it to open that record. For the full history, use the Movements report. See Reports.
Low stock
To be warned when an item runs low, check Monitor low stock on the item's page and enter the quantity in Alert at. Variants can have their own Alert at; left blank, they use the item's.
An item is low when its on-hand quantity is at or below its alert quantity. Low items:
- appear on the Low Stock card on the Inventory page, with their supplier and supplier part number;
- show their on-hand quantity in amber;
- are counted in the number next to Inventory in the sidebar and on the Dashboard.
From the Low Stock card, Add to PO puts the item on a purchase order with enough to get back to the alert quantity, and Receive receives it directly.
Counts
A count checks the real quantities on your shelves and corrects stock to match. Open Inventory › Counts to see open and past counts.
Starting a count
Click New count and fill in:
- Name (optional): for example "Year-end count" or "Shelf B".
- With locations: All locations (choose the location while counting) or One location.
- Blind count (hide the expected quantity while counting): counters don't see what the system expects, so they count what's really there. Administrators can make this the default in Admin › Settings › Inventory.
Click Start counting. The count gets a reference starting with C and opens in count mode. Open counts are listed on the Dashboard.
Count mode
Count mode is a full-screen page made for a phone or a PC at the shelf. You can open it from the counts list or with Count mode on a count's page.
To count an item:
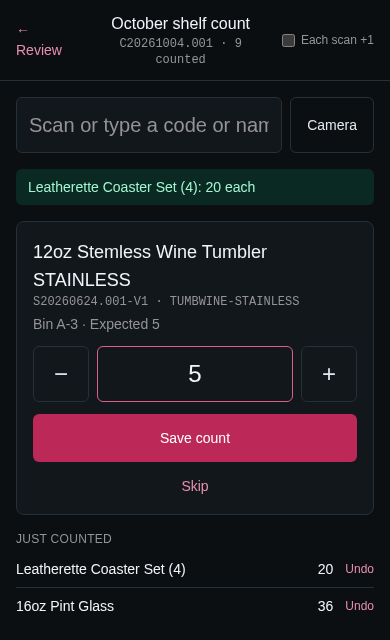
- Scan its label with a USB or Bluetooth bar code scanner, type its code or name in Scan or type a code or name… and press Enter, or tap Camera to scan with the phone's camera. Codes can be the stock reference, a variant's code, a SKU or a label's link QR code.
- If several items match, tap the right one.
- Enter the quantity (or use − and +) and tap Save count. Unless the count is blind, the screen shows the expected quantity and the bin.
When you scan an item that's already counted, you choose Add (add to its count, for example a second shelf) or Replace with (the new number replaces the old one).
Each scan +1 counts by scanning every single unit: each scan adds one, with no quantity to enter. Each device remembers this setting.
Just counted lists your recent counts; tap Undo to take one back. With locations, choose the location you're at in Counting at.
Camera scanning only works when BLP Workbench is opened over HTTPS. Without it, count mode says so, and a USB or Bluetooth scanner still works. See HTTPS.
Reviewing and committing
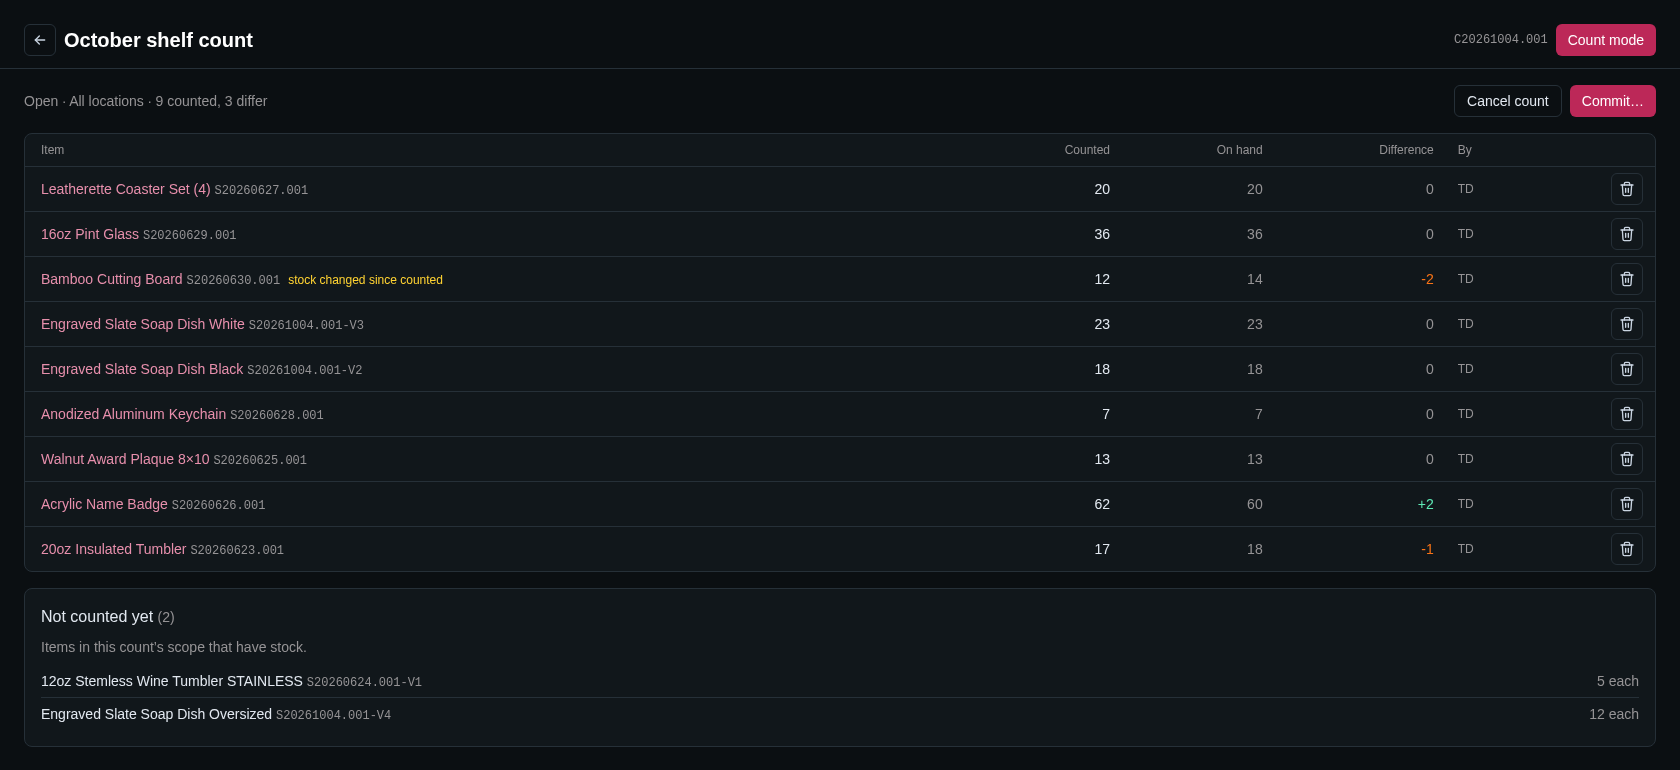
Tap ← Review in count mode, or open the count from the list, to see the count's page:
- every counted item with Counted, On hand and Difference, and who counted it;
- "stock changed since counted" when the stock changed (for example a delivery arrived) after the item was counted;
- Not counted yet: items in the count's scope that have stock but haven't been counted.
Remove a wrong count line with its trash button. Cancel count discards the counted quantities and leaves stock as it is.
An administrator clicks Commit… to finish the count. Each counted quantity becomes the new on-hand quantity. For items that weren't counted, choose Leave them as they are or Set them to zero (full count), then click Commit count. Committed counts stay in the list with what was expected and counted.
Labels and bar codes
With the Bar Codes module on, every stocked item and variant can get a bar code label. Scanning a label in count mode finds the item right away.
- Stock labels: the bar code button on the Inventory page prints a label with the code, name, SKU and, in single-location mode, the bin.
- Product labels: the bar code button on an item's page (or next to a variant) prints a label with the code, name, SKU and price. See Bar code labels.
- When receiving: the receive dialog can print labels for the new stock right away or add them to your batch.
In the label dialog, set the number of Copies, choose Include link QR code (a QR code that opens the item in BLP Workbench), and on label sheets pick the first position to print in, so a partly used sheet isn't wasted. Print at 100% (actual size) with margins set to none.
Label size, code style (Code 128, QR code or Data Matrix) and default copies are set in Admin › Settings › Bar Codes.
Printing labels in a batch
When Enable batch label printing is on in Admin › Settings › Bar Codes, label dialogs have a + Batch button that saves the labels for later instead of printing them. A Print Batch tab at the top of the window shows how many labels are waiting. Click it to see the batch, remove entries or Clear batch, and print everything at once, so mixed labels fill whole sheets. After printing, you're asked "Did the labels print correctly?": Clear batch empties it, Keep keeps it to print again.
Each person has their own batch, and it stays when you reload the page or switch devices.
Purchase orders
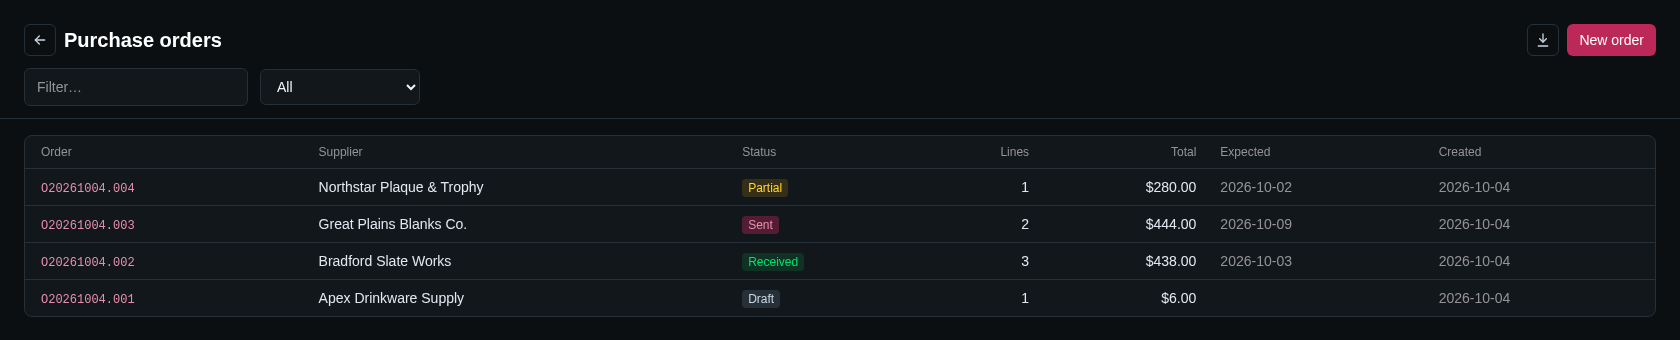
Purchase orders record what you order from a supplier and let you receive against the order, all at once or in parts. Open them with Purchase orders on the Inventory page.
Purchase orders can be turned off with Enable purchase orders in Admin › Settings › Inventory; this hides the Purchase orders page, every Add to PO button and the dashboard's order alerts.
The list starts with Open orders (draft, sent and partly received). Pick another status, or All, in the status list, and use Filter… to search. Export to CSV downloads the list.
Creating an order
There are two ways:
- New order on the Purchase orders page starts an empty draft. Choose the Supplier, then add products with Add a product: name, SKU or code….
- Add to PO (or the cart button) on the Low Stock card, an inventory row or a product's page puts that item on the newest draft order for its supplier, or starts a new draft. Choose the quantity (and the variant, for items with variants) and click Add to order. If the item is already on that draft, the quantity is added to its line. The dialog links to the order.
Any product or material can be ordered, even one that doesn't track stock. Receiving such an item marks it received without changing stock.
Editing a draft
While an order is a Draft, you can change the supplier, each line's Qty and Unit cost (it starts with the item's cost), and remove lines. Expected is the date you expect delivery, and Notes (printed on the order) appear at the bottom of the printout. Click Save.
When the order is placed with the supplier, click Mark as sent. From then on the supplier and lines can't be changed; the expected date and notes can.
Receiving against an order
When a delivery arrives, open the order and click Receive…. The dialog lists each line with what was ordered and already received; Arrived now starts with everything still outstanding. Change the numbers to what actually arrived (with locations, also choose Into location) and click Receive.
The stock is added to the default or chosen location and recorded with the order's reference and the line's unit cost. If anything is still outstanding, the order becomes Partial; you can receive the rest later. When everything has arrived, it becomes Received.
Printing an order
The printer button opens a printable order with your logo and business details, the order reference and date, the supplier's name, address and your account number with them, your address as the ship-to address, the lines (with supplier part numbers and SKUs), the total and the notes. Click Print. The paper size follows Admin › Settings › Regional.
Cancelling and deleting
Cancel order closes an order that won't be delivered. It stays in the list as Cancelled; stock already received stays.
Only administrators can delete an order, with the trash button next to its title. Stock already received stays, and an administrator can restore the order from Admin › Maintenance.
Open orders are also shown on the Dashboard, with late ones highlighted.
Stock for won deals
When Deduct stock when a deal is won is on in Admin › Settings › Inventory (it's off by default), winning a deal takes the accepted quote's tracked products out of stock, from the default location:
- Each tracked product on the quote leaves stock as a Sold change linked to the deal. Stock may go below zero here, even when that's otherwise not allowed.
- For items with variants, the quote line must name the variant. Lines without one are left out, and BLP Workbench tells you which.
- After the deal is won, a message says what was taken out and what is now below zero.
Reopening the deal puts the stock back as a Returned change. Winning it again takes it out again.
See Deals and quotes for winning and reopening deals.
Reports
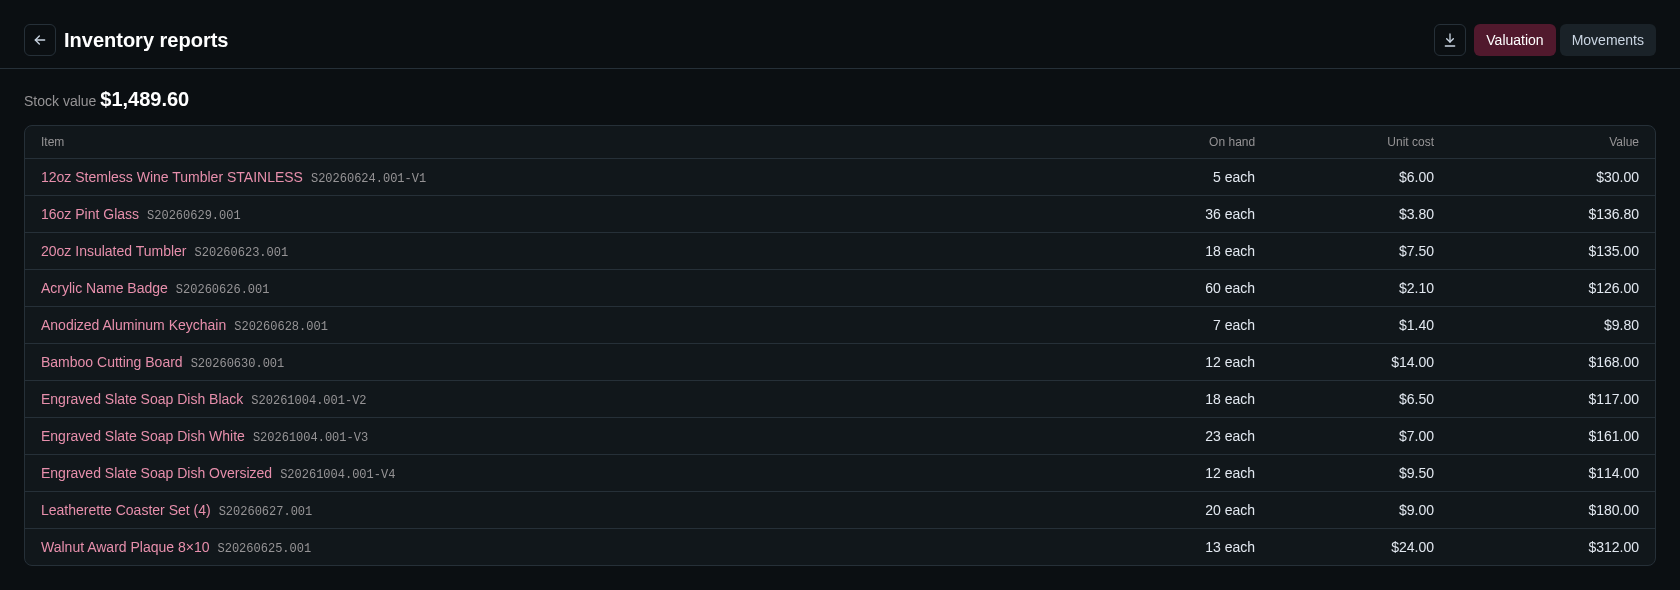
Open Reports on the Inventory page. There are two tabs, and each exports to CSV:
- Valuation: what your stock is worth at cost. Each item and variant with stock is listed with On hand, Unit cost (from Products & Services; a variant without its own cost uses the item's) and Value, with the Stock value total at the top. Items without a unit cost are marked and left out of the total.
- Movements: every stock change, newest first, with when, item, type, quantity, the quantity after, location and reference. Filter by item (Any item…), type (All changes or one type) and dates (From, To). The page shows the newest 500 changes; narrow the filters or export to get them all.
Inventory settings
Administrators find these in Admin › Settings › Inventory:
- Stock is kept: As one quantity per item, with a bin label or Per location, and the Locations list. See Locations.
- New products track stock by default.
- New counts are blind (counters don't see the expected quantity).
- Allow stock to go below zero.
- Enable purchase orders. See Purchase orders.
- Deduct stock when a deal is won. See Stock for won deals.
Click Save after changing the checkboxes. See Settings.